Installing a Post Divider
1. First you will need to upload your post divider into Photobucket or similar site.
2. Log into your Blogger Account.
3. Click on Layout.
4. Click on Edit/HTML
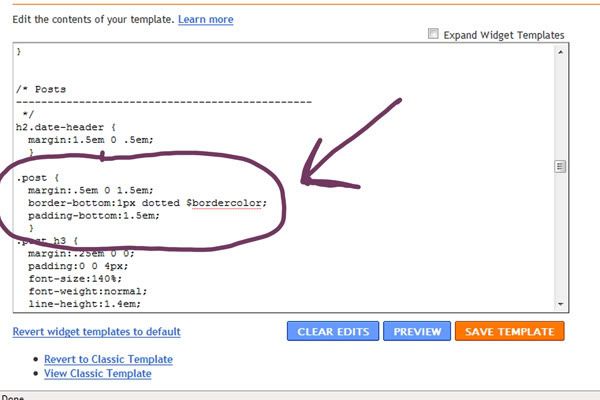
5. Scroll down until you see this:

6. Replace that entire section with this, putting your dividers direct link from Photobucket into the highlighted part:
.post {
background: url(http://YOURDIVIDERADDRESS);
background-repeat: no-repeat;
background-position: bottom center;
margin:.5em 0 1.5em;
border-bottom:0px dotted $bordercolor;
padding-bottom:5.5em;
}
7. Save your template, and you should have a post divider!!


6 comments:
Hi...my name is magali and I'm from Bahia Blanca (Argentina).
Your blog is wonderfull.
Thanks for the tutorial!!!!
http://thisismyworld2009.blogspot.com/
XoXo
Magui-
these tutorials are so helpful! thanks! :) -Erin
Thanks so much for your wonderful blogware.
But I have a question. Can you explain to me how I can installing the sidebar tabs?
Thanks so much!
hugs Martina
Thank you! I just used your instructions for this and it worked great! Thank you again!
Thank you so much! :)
thank you for this!!
Post a Comment